If I Bounced on Fl Then Bounced Again Logic Does It Lower Sound Quality
So, you've finished composing, recording, arranging, mixing and mastering your vocal/music in Logic. What adjacent? Well, you could play your finished music tracks in Logic... as much as I love Logic, it's not my music actor of option! You might want to heed to your finished rails in the car, in the bathroom, on your iPod via iTunes... or perhaps you have grander aspirations and desire to share it via YouTube, MySpace, Facebook or burn down it to a CD as a demo or to set up it for a Mastering studio! Every bit you tin see the list grows ever longer. What y'all practise with your music subsequently you've finished the artistic procedure is entirely up to you... merely the big question is how to get your music out of Logic and into the wider world. In this Hub Tutorial we'll embrace just how to practice that in both Logic viii and Logic 9.
Pace 1 - Leave it O ut
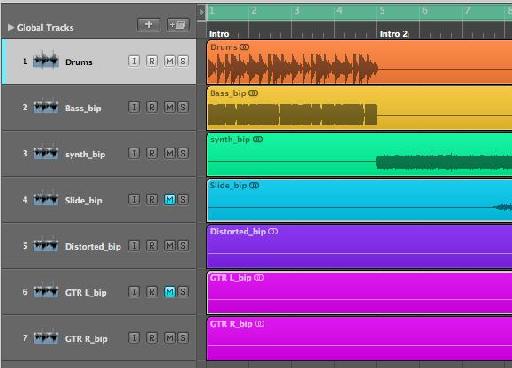
The kickoff aspect is to cull what parts of your Arrange window you want to be present in your final mix. I dominion of thumb is that everything yous tin can hear from Logic'southward Stereo one-2 output channel will appear in your exported audio file.
And then now is a practiced time to mute any tracks or regions yous don't desire in your terminal mix!
Footstep ii - Not Eastward xport, Bounciness
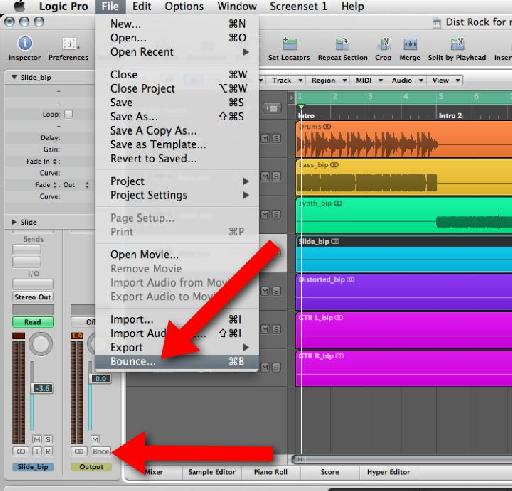
The commencement fourth dimension nigh anybody, myself included, wanted to export their finished vocal from Logic they begun looking for the consign control... Stop right in that location! This is Non what you want in this example. The File > Consign... command will only permit you to export selections to a MIDI file and tracks to individual audio files. So if you accept 10 tracks in your projection so those 10 tracks volition be exported to 10 respective audio files. Of course, this means in iTunes you'll simply be able to listen to ane of these tracks at once!
What we want to do is to mix-down or return all audible tracks to a single audio file. In Logic this process is known as "Bounce". Y'all'll detect this in the File > Bounce... menu.
You lot can also see the Bnce button on the Output Channel Strip in the Inspector and/or the Mixer window.
Stride 3 - The Bounce Window Demy stified
The Bounce window is a cross betwixt a normal "Salve as..." dialog and a vast assortment of possible variables and options to choose from. If you're familiar with computers and Macs, y'all'll probably exist comfortable with the top half of the window. Here yous can choose the name of the bounced file and cull the location it volition be saved to.
The Bottom one-half of the Bounce window deals with the Destination, file formats and type of bounce y'all wish to perform. The first area to focus on is beneath the Destination box. Here nosotros tin can decide what area of the Arrange area will be bounced past setting the Beginning and Terminate points.
Notation: If you prepare a Cycle expanse in your Organisation earlier bouncing the Starting time and Finish points will be automatically set up to the Left and Right locators respectively.
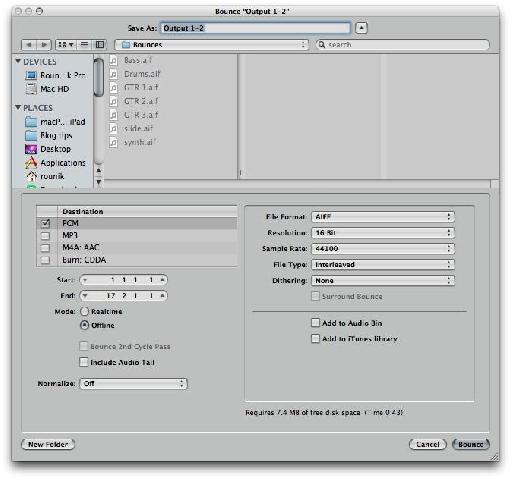
The Bounce manner tin can be changed between Realtime or Offline. Ordinarily Offline volition be quicker but you won't exist able to hear the Bounce as information technology takes identify. Also if you use some realtime objects in Logic's Adjust area like Delay Lines and Arpeggiators they may not appear in the concluding bounced audio file.
Include Audio Tail is useful if at the terminate of your song there may be delay or reverb that is nevertheless audible across the end signal. This feature volition allow it to be captured rater than cut off at the cease of the song.
Finally the Normalize characteristic normalizes or raises the level of the final audio to get in perceivably louder. I normally keep my set to OFF as I prefer to mix and master to my own custom settings before Bouncing the project. Other options include On and Overload Protection Only. This subsequently option can be very useful if bouncing a quick mix to make sure the levels never prune or cause any distortion.
Stride 4 - Destination Unkno wn
The Destination of your final audio file depends very much on how y'all desire to distribute or listen to it. Selecting a Destination will update the Format options on the right of the Bounce window.
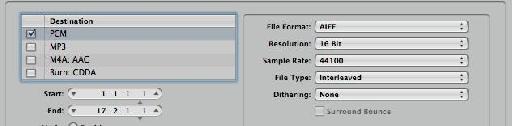
PCM: PCM or Pulse-code modulation, is a standard grade for digital audio. It is uncompressed and can provide loftier quality. Yous should be using this destination to annal your song and/or pass a mix on to a studio for Mastering and to bounciness to CD.
Hither you can choose the File Format (AIF and WAV are all the same the 2 near popular and widely accepted at time of writing).
Resolution (CD spec is xvi-bit, to provide a Mastering House with your mix you should utilize 24-bit).
Make sure the Sample rate is either the same as your project or if needed change it to the sample rate required. CD is 44.1kHz. Sound for film will usually exist required at a sample rate of 48kHz.
Interleaved file type will identify the left and right channels in the same audio file. There may be time when you want the Left and Right sides of your stereo field split to work well in Pro Tools...
The Dithering options are used when reducing the Bit Depth of your project from 24-bit to sixteen-bit. It adds a tiny amount of noise. Information technology'due south across the scope of this blog mail service to outline the unlike algorithms available here... In that location is no i size fits all. Try them out and listen back to get a sense of what sounds best to your ear.
Step 5 - MP3 and M4A/ AAC
If you're interested in creating mp3's or lower quality compressed versions of your music for distribution via MySpace and other MP3 sharing sites... or merely to place on your iPod, enable the MP3 option!
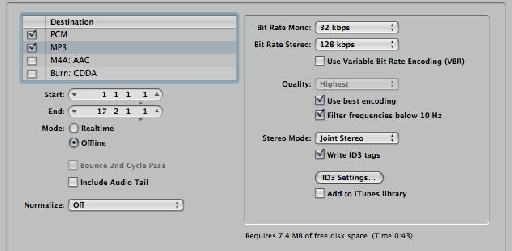
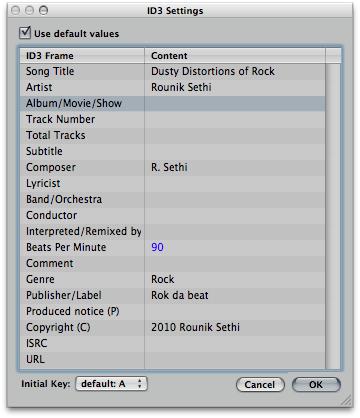
After enabling the MP3 pick, make sure the MP3 destination is highlighted so the Format options are updated to reflect that. Here you lot'll exist able to change the quality of the Bit rate, encoding and fifty-fifty set the ID3 tags. These are tags that will be written to the mp3 file, for case the composer, artist, copyright, etc.
You have less options nether the AAC destination, only arguably they're better quality that mp3. For both mp3 and M4A/AAC you can also choose to add to your iTunes Library.
Pace half-dozen - Onto CD
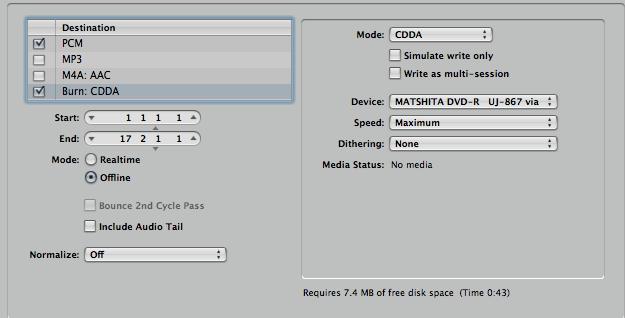
Although it may feel like CD's are on their way out... unfortunately... There are times when you lot may want to burn down your runway direct to an Audio CD from Logic. That's exactly what the Burn: CDDA destination option allows y'all to do.
Yous can cull to Burn to CDDA (CD Digital Audio) or DVD-A (Audio DVD) from the Fashion drop-down carte.
The other options are standard for most Burning software, but chiefly you must choose the correct device (CD Burner continued to your Mac), speed and dithering options. Remember that if your project contains any 24-bit audio files yous'll demand to utilize the dither options to reduce the flake depth to 16-fleck (which is required due to the CD tech spec).
Now you're ready to Click the Bounce or Bounce & Burn button! I hope y'all savour listening to your mixes exterior of Logic!
To larn more about Logic check these tutorials out!
We'd love to hear from you. Let us know what you think by writing a annotate below!
.
Source: https://ask.audio/articles/logic-9-howto-export-music-logic
Post a Comment for "If I Bounced on Fl Then Bounced Again Logic Does It Lower Sound Quality"